There are so many advantages of WordPress multisite. In just one WordPress installation you can create so many websites.
Table of Contents
It helps you in sharing users and data, permits for connections, and gives you an opportunity to start getting revenue from your WordPress installations as you will be able to sell websites to users on a network.
For your website, sometimes single website WordPress installation might work as a perfect option because you might not be looking to share a user’s database with other websites.
Or in case your website is much more popular and bigger than others then a single WordPress installation is the better choice or there are possibilities that you might be looking for a different hosting environment for that particular website or you might be removing your website to your own single installation of someone else’s multisite network.
Another chance is that you might be establishing a little multisite network but now you are looking to eliminate all websites by leaving one and would like to make it behave as a single website installation.
The best thing is that you can relocate sub-website to WordPress multisite to a single site or you can even convert the network from multisite to a single website.
But the major problem is that by relocating a single website to another domain or an installation you will face so many problems. Thus the task of relocation will be much difficult.
In this blog, we will learn that how easily you can migrate or relocate your WordPress site to a single site from a multisite that too without compromising on data.
Let us first see why the process of moving WordPress multiple websites is difficult as compare to moving the single site to multisite.
First of all, we will learn about migrating multisite network to single-site installation and will try to learn that why this is one of the difficult processes.
In which method, your WordPress multisite stores your files or data is the major reason for this complication. And the actual scenario is that few set of data is stored with the others sites data in the network.
Below you will find the data that is stored by a multisite network:
In WordPress, every site stores upload files separately – content/upload/site/xyz. Here xyz is a specific site’s ID.
In dedicated database tables, most of the data including post metadata, posts, taxonomies etc are stored differently for every website.
Every time dedicated database tables are developed as soon as a new website is added to its network. Such tables are given prefixes with the site’s ID. That means for site 13 the post ID will be wp_13_posts.
For a complete network, the user data is kept in two different tables. Rather than becoming one site’s users, the user will be having an account on the network. This account will store the site’s metadata which they will be accessing.
In short, you will not be able to export the database of users and will not be able to migrate it to new website. Separately you will need to move the site.
In the network all themes and plugins files are stored does not matter how many websites are already activated that particular plugins or themes. This is the biggest advantage of multisite.
This clearly means that you have to keep the plugins and themes updated once. But while migrating the website to network the things will get more difficult.
We will see the migrating process of the website from WordPress multisite to a single site. Plus we will see to make the migration process successful, how you can deal with every separate part of your website.
Terminology: Below you will find the word ‘sub-sites’ means a website with a multisite network. To refer core site in the network we will be using ‘base site’ terminology.
This word we have referred to before multi-website is activated. And own dedicated WordPress installation will be referred to as a ‘single sites’ which is also called a standalone site.
How to immigrate sub-site to the single site from WordPress multisite
We are assuming that you are new to this scenario thus you do not know anything about the process of migrating the site. Let’s check out some easiest methods for doing this
Methods are:
- Utilize the feature of WordPress plugins to migrate files and data manually
- To export files and data use a migration plugin
- Implement manual migration
1. To move sub-site from multisite network to single website use free WordPress plugins
The very first option to migrate WordPress multisite to single site is to use import/export plugin to move all content whereas another free plugin will be used to migrate settings of widgets.
The best thing about these options is that you can access the plugin to complete your task free of cost. Thus you don’t need to mess with your database so it is the best method for beginners to learn and practice migrating. But it does come with some disadvantages.
- The content created by the users is only those who had moved user. Manually you will need to migrate entire users.
- Rather than widget settings no other settings will be migrated. This method is not worthy for you if you have complicated plugins such as eCommerce plugins or any other difficult settings. The reason behind this is because you will be needed plenty of time to copy all other settings manually.
But this option is highly recommended for those who are having a simple website and consist of a small number of the plugin. It will simple for you to customize the things as per your needs.
Below 6 simple steps are given to perform it at ease:
- Build modern single-site installation
- Integrate some themes and plugins as they were in the previous website and activate it.
- Using the import/export plugin, move the complete content
- Using widget import/export plugin, move the widget settings
- With the help of the user import/export plugin, add new users who are not the author or the content.
It seems like you will have to follow quite a lot of steps to achieve your dream but worry not because these steps seem to be lengthy but they are more automated and quicker to proceed.
Build new single-site installation
On your new single website, you need to start installing WordPress. You will get the temporarily domain name when you create a site as you might not be looking for using the same domain name from your previous one. Save it so that it will be helpful when your website starts working.
With the help of manual installation or installer, add WordPress.
Install WordPress themes files and plugins file
The theme and plugins you were using on your previous website in the multisite network need to be installed on the new website.
Before migrating content it is very important to ensure this step is done because the themes and plugins build content types like post types etc that are crucial to getting migrated.
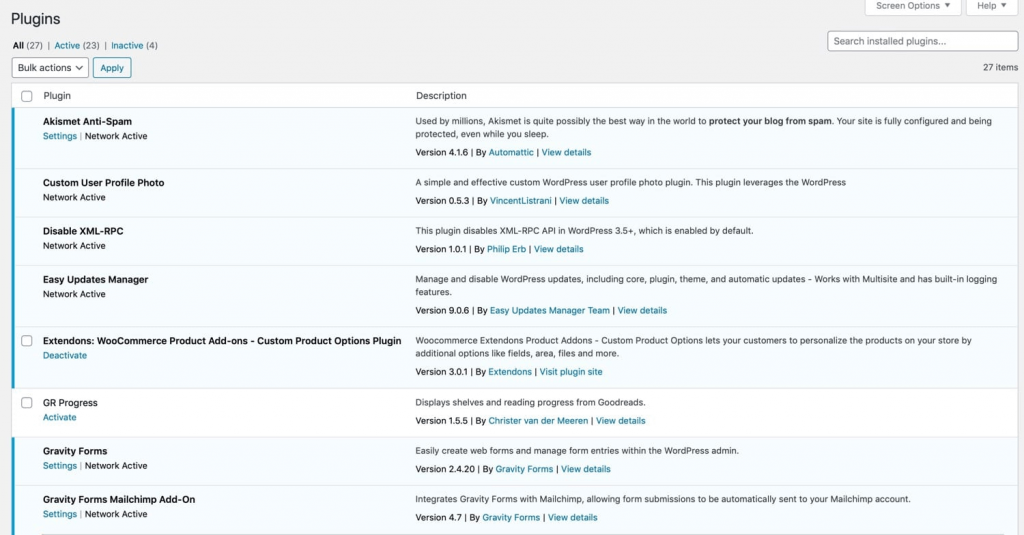
In the WordPress dashboard open these themes and plugins from your old website in a multisite network and examine which theme and plugin are activated.
If you recognized that the themes and plugins two both are from WordPress themes and plugins directories, then in your new website you can install and activate it normally.
If you recognized that you dent have licensed for these themes or plugins because of the premium package then you will have to purchase it first. From the provider, download the plugins and themes and install them all with the right guidelines.
Ensure that all similar plugins and themes are activated before continuing on the new website. Do not take tension about configuring and running via wizards because this step will learn afterward?
Using import/export plugin migrate the content
Now, the next step in moving the WordPress multisite to a single site is to export content to new site from old site.
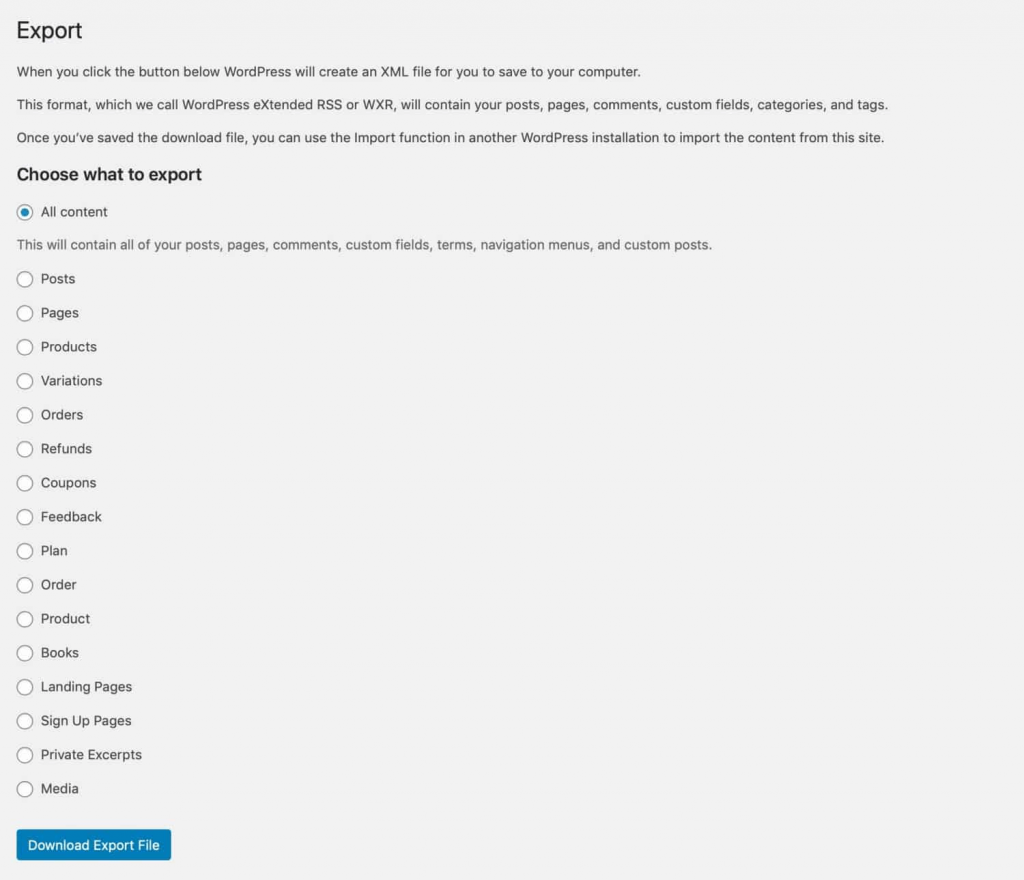
Once you have activated the plugin after installing you need to visit tools settings and then click on export.
You will find the option to select ‘all content’ under choose what to export. Now simply click on the ‘download export file’ button.
On your computer, this step will download the XML file. It will have a similar name as your website’s name. Ensure you have saved this file in another place too to keep it safe. However, you will need this file again to import it on the new website.
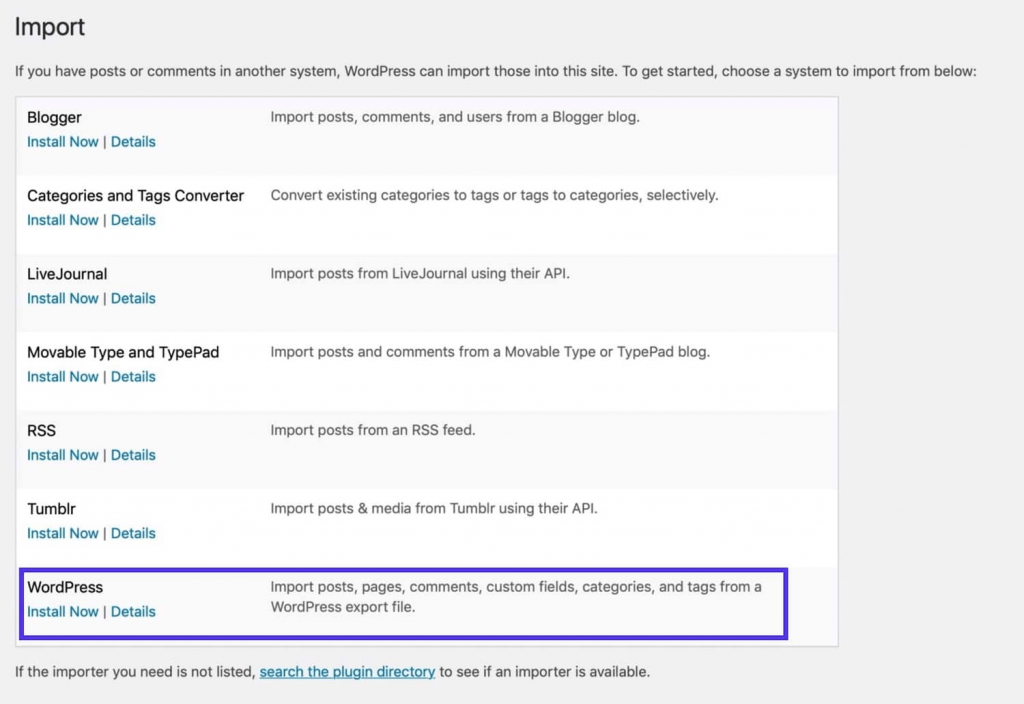
Now start opening your new website and visit the dashboard click on Tools and then click on import.
If you find that the import plugin is not yet installed then under WordPress click on ‘install now’.
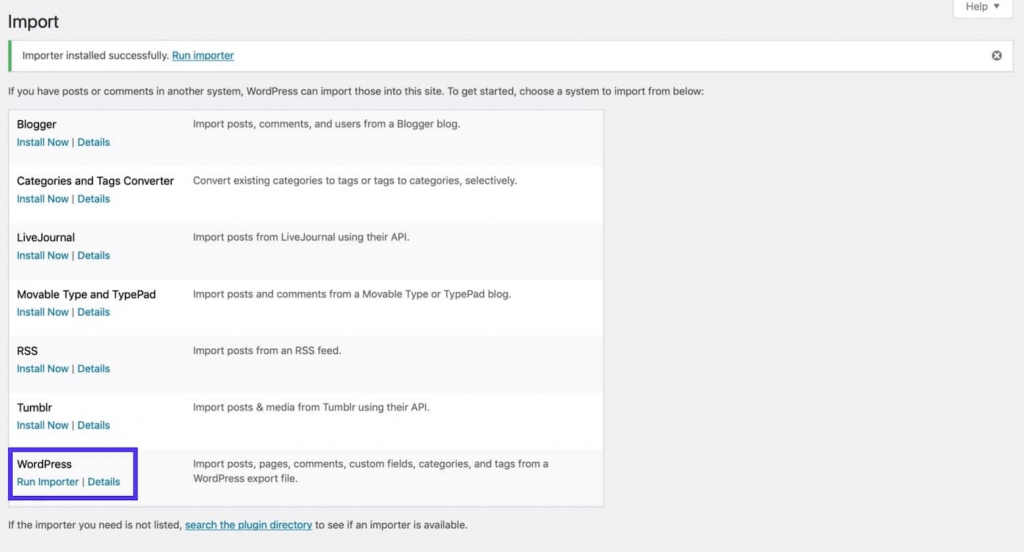
The plugin you wish to install will be added you need to click on activation and run the importer. You will find the option to run this plugin at the top of your screen.
You will be taken to a new screen where the XML file is uploaded, by clicking on that specific link.
Now tap on the button which says ‘ choose file’. Now on your computer find the XML file and click on another button that says ‘uploads file and import’.
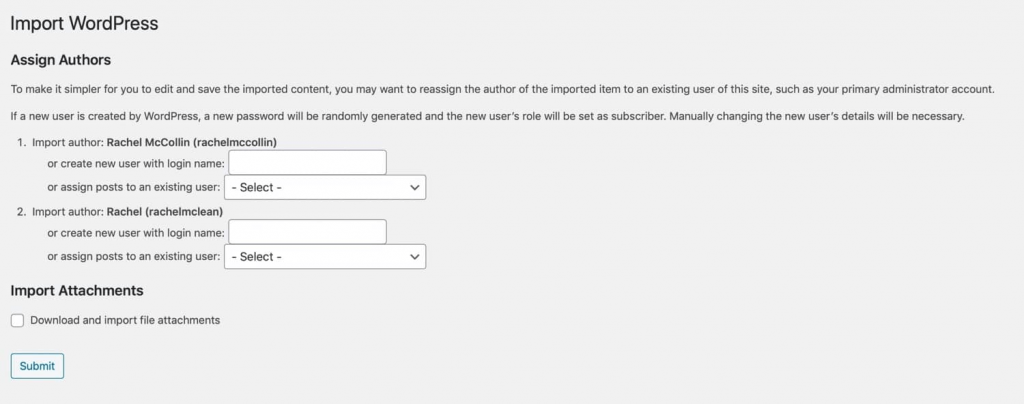
You will be asked by WordPress to assign authors and make the decision whether you want to download attachments or not.
In your new website select the authors which are related to your old site’s authors. If you have not selected the authors then in the login name, type the name by doing this the new user’s account will be added by the importer. After this click on the check box which says ‘download and import file attachments’.
Now click on submit to save the changes and the content will be imported by the importer from XML for you. Navigate to the posts screen. now you can see all listed.
Using the widget import/export plugin move the widget settings
Most of the setting is not able to import by you. But using the widget importer & exporter plugin you can import the widget settings.
On both sites install and activate the plugin. But only if you have access to the network to plugin installation then only you can do this.
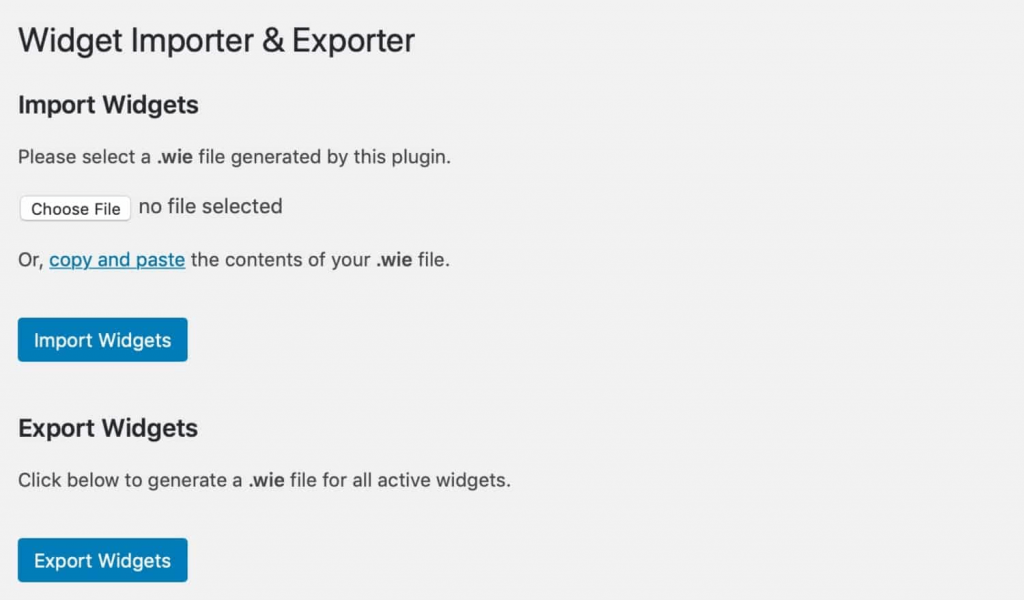
Now navigate to the tools and then click on the widget importer and exporter option on the original website.
Now click on the Export widgets button .wie file will be downloaded to your computer.
Now navigate to the tools option and then go to widgets importer & exporter option and now select the file that you have downloaded by choosing the file button option.
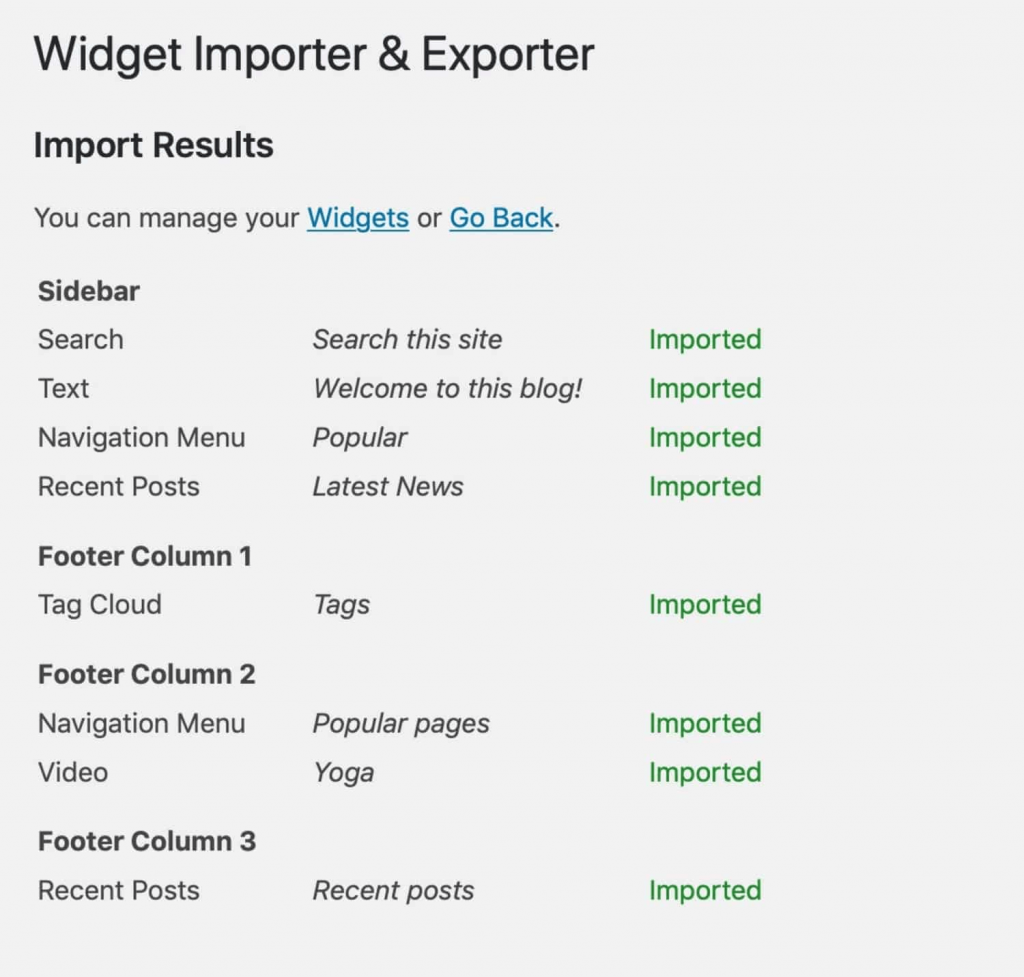
After this click on the button that says import widgets. The screen which showcases the widgets that have been imported will be shown.
Another step is importing the users which were not established while importing the content. If you are migrating the website you will have to follow this step. It will cover the end post. To the ‘importing users’ section scroll down the page.
Now update the setting in the new website finally.
From the old sub-site copy the settings manually to the new single site
The very last step is to go new website and update settings.
You need to perform this task manually. So this task might be difficult for you to perform.
In a single browser window, open the admin screen of the old website and open the admin screen of the new website in another tab. To get better results it is recommended to use two different browsers so that you can check on the difference between both.
Work via screen settings in detail. In the new website do some changes so that the changes can appear on the old website.
Once you completed this process, you will get a new website up and running. The last stage will be to update the domain name. This method is explained in the detail. In the below section i.e. migrating domain name, you will find the steps to update the domain name.
2. From WordPress multisite to single site migrating a subsite use migration plugin
On a multisite network, if you have control over the migration plugin them migrating the WordPress multisite to a single site will lot easier task.
This process will also seem to be reliable as compare to the usage of the import/export plugin. In short, you do not have to access the database directly.
That is the reason, your database is safe as compared to manual integration. So if you are comfortable with the using plugin and looking for the simplest solution then this strategy is good to proceed with.
First of all start by migrating the old site. For this, you will have to integrate the migration plugin that is supported by your WordPress multisite. This will help by migrating only a single website rather than migration the complete network.
For a large website, you must use one of the best free WordPress plugins i.e. Migrate Guru Plugin. But this plugin is not helpful as it will not allow you to migrate a single website from the network with multisite.
Actually, there is no longer any free plugin that will help you to do it. But fortunately, you will come across a premium plugin that will help you in migrating as per your needs.
Out of all premiums migrating plugins, you will find that most of the premium plugins will not be supporting the migrating of subsite from the network.
But fortunately, we found the two best plugins that support this feature greatly i.e. all in One WP Migration and Duplicator Pro plugin. These two plugins will help you in transferring databases and files by their servers.
To will have to purchase and install this plugin on the new site and both networks to run migration automatically.
To perform the migration you can follow its documentation. With the migration, you will need to build a package from the old site and import it in the new website.
You will have to migrate data separately as user data is stored in the entire network.
3. Out of a WordPress multisite, migrating the subsite to a single site manually
Manually migration is the last step in moving WordPress multisite network to single site. If you are known to basic technical stuff or comfortable in handling code then you should go with this step. You need to access phpMyAdmin and modify your database export files.
The website you are trying to move will consist of three main factors to copy from a multisite network. Those three components are listed below:
- Uploads: In sub-site’s subdirectory you will these in wp-content/upload/sites.
- Theme and plugin files – You can copy or reinstall these on the new website.
- Database tables – All database tables will not be required for you but need one that is related to your website.
Note: Before the release of WordPress 3.5, if your multisite network was launched then you might not have access to the sites folder.
Rather than having a sites folder, in wp-content, you will have access to blogs.dir folder along with all upload files for sub-sites. The site you are migrating will have numbered folder, that you copied instead.
First Backup
It is always a good thought of backing up your multisite installation first before migration. You will find a lot of plugins for backup or with the help of the hosting interface you can also create a backup if they allow you.
You can utilize this backup for copying similar kinds of files to your new website. In case if you lost your files these backup files will preserve your whole struggle.
In a multisite network, find your sub-site’s ID
Every network has a separate ID. To recognize its folder the ID is useful in wp-content/uploads/sites directory. Plus it helps you to recognize the tables of the database from that particular website.
First of all, navigate to network admin and then click on sites and choose the edit option for migrating the website.
The URL should be always looking like http://mynetwork.com/wp-admin/network/site-info.php?id=XX.
XX is your site’s ID. Plus it will be the folder’s name that contains the files along with the prefix for database table names.
From WordPress multisite migrate the plugins and theme files to a single site
To move the themes and plugins file from WordPress multisite to a single site, now you will first need to recognize the plugin that your website has installed or been using by uploading them or plugin screen the backup of your previous website. On your new site, copy wp-content/plugins.
By navigating to plugins screens on your subsite you will be able to find which particular plugins are working. The plugins that are network-activated can be included.
For your theme, repeat the step i.e. from your backup copy it to your new single site’s WordPress installation folder i.e. wp-content/themes directory, or just reinstall it.
From WordPress multisite subsite migrate the uploads to single-site
In wp-content/uploads you will find the sites folder if your network was not built before WordPress 3.5 update. With your subsite’s ID find the subfolder and to wp-content/uploads folder upload its content to the new website.
If you are unable to find the site folder then you will surely have a blog.dir folder as your network might not have created after WordPress 3.5 release.
However, if you have blogs.dir folder then it might consist of a Site’s ID folder. Under this folder, you will get access to the subfolder which is also known as “files”.
All the content from the files folder needs to be copied to the new website’s wp-content/uploads folder.
Note: The folder created by WordPress in the new upload folder needs to be deleted to ignore any clashes.
Now all files will be installed. Remember that do not activate these plugins because you have already migrated the database which will also copy all themes and plugins settings and activation that will activate the plugins and theme automatically.
From a multisite network, export the sub-site’s tables
Because you will not be moving complete installation but only a single child site, you will not require an entire database’s contents.
For your multisite network open phpMyAdmin and then open the Export tab.
Then a single site, a multisite network has plenty of tables. For every site an extra sets are available. Related to the site you are looking at, find the tables related to it. With wp_XX it will start.
XX means your site’s ID.
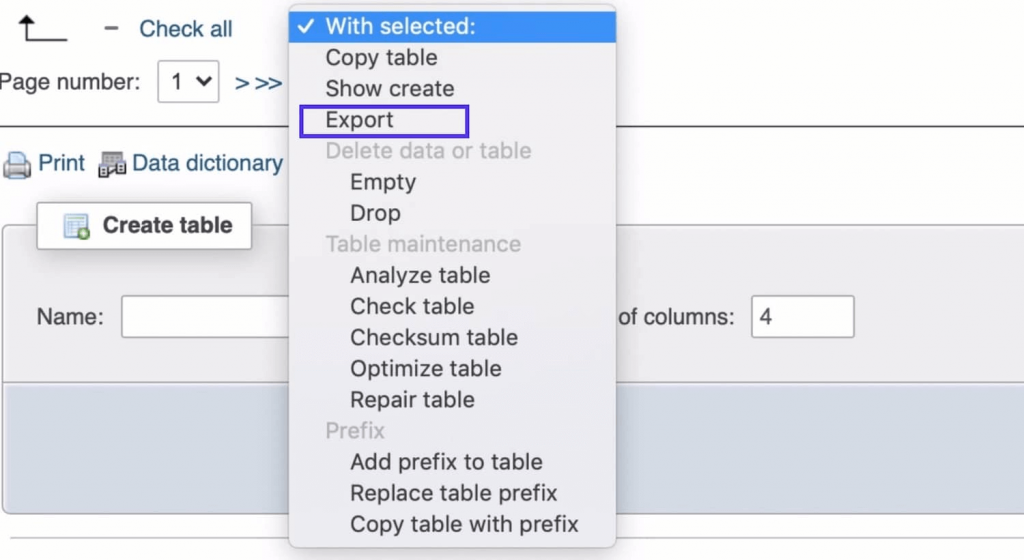
Related to your child site, choose all tables and then to the With selected: Box, scroll the page down.
Mouse clicks on that option and chooses the Export button.
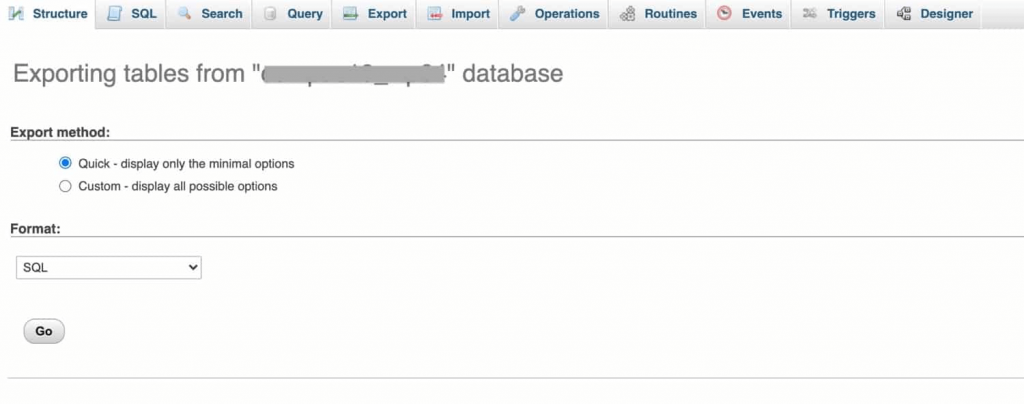
On the new screen, ignore the export method and mouse click on the Go button.
Now Modify the Database Tables
The SQL file which has been downloaded on your PC, copy that file and provide a name to that file by adding the “copy” word to it. After this open this file in the code editor.
Two things you need to modify: Table references and links.
Begin with the links. All instance of site’s domain needs to be changed in the multisite network to the newer single site domain. Consider an example that your website URL was http:/network.com/mywebsite so now you have to change it to http://mywebsite.com.
You will have to modify all instances of your old website URL if your network is making use of a subdomain. If you are making this change then we would also recommend you check the subdirectory version and save the file.
For your site ID, the new single-site installation’s database table would not have prefixes so ensure that you have removed these.
Ensure that in the SQL file, all instances of wp_XX_ should be replaced with wp_, where XX meant to be your site’s ID.
After this save the SQL file.
From a sub-site migrate the database tables to a single site
You will have to import the database table as you have modified the SQL file. In WordPress installation, start dropping previous or existing tables.
Now open your new website’s phpMyAdmin. From the database of your new site select all the tables but ignore two major tables i.e. wp_usermeta tables and wp_users table.
Hit the button that says With selected: dropdown box, and choose a drop option. Click on Go as soon as it takes you to the new screen.
The edited database now needs to be uploaded. Follow the steps to update.
- Click on import option
- Mouse click on button that says ‘choose file’
- Choose the edited SQL file and hit the OK or Choose button
- Now click on the Go button.
After some minutes the notification will appear which will say that the task of uploading a file has been finished successfully. If your database is large in size then it might take a longer time to get the task finished.
Final Steps
After all these steps you will have to clear the cache of your browsers. If your browsers consist of some old site’s content then the process of cleaning cache will resolve such a problem.
For the new site, log in to the WordPress admin. The login details will be similar to the old site if you have deleted the user table.
But if you have not deleted such tables yet, then it will have all the information that you have mentioned while WordPress installation in a new location.
Check if plugins, widgets, and all links are working properly or not. If you found something went wrong then you can take a step back with the help of backup or simply you can start tweaking something within your new website.
Once you got to know that each and every small stuff is working properly then it is time to delete the website from a multisite installation.
But in case you found that everything is not moved properly then it is suggested to leave it as it was. At this time you will have to move the domain across in meantime.
From the network, if you want to remove it then go to the Network Admin then click on sites. Now find out the website and hit the delete link which is visible below its name.
At last, you have completed the process of uploading the updated database.
From WordPress multisite subsite migrating users to a single site
Migrating other data from the site in network is easier as compared to migrating users from WordPress multisite to single site. The main reason it is complicated is that the users are actually stored for a whole network in just a single database.
In short, this clearly means that from the network you will not be able to export the wp_users table unless your network has a single user.
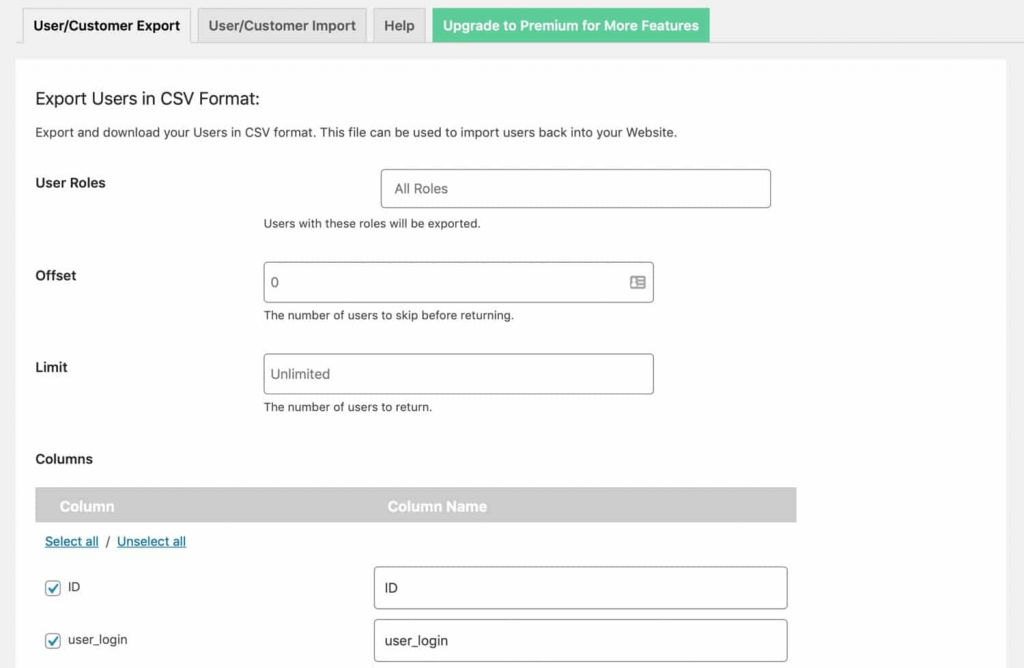
Instead of this, you will have to make use of the WordPress plugin so that from the network you can export the users to the new site. For this task, you can make use of import/export WordPress user’s plugins. This plugin is available for free of cost.
You need to install this plugin on both websites plus need to activate in the multisite network for sub-site and on the new website.
Now you will have to go to users then click on user import-export in the sub-site.
Click on the export user’s button after scrolling the page. This option will help you to download the CSV with your complete user data.
Go to the users and then click on the import-export button again on the new website. Now click on the tab that says user/customer import.
To select the CSV file click on choose file button, After click on the button that says upload file and import button.
This plugin will help you to upload the file and will successfully import all users from the previous website. Now you will be shown to the screen to those users that you have imported.
Now all aspects of your previous website have been imported from the multisite network to the new WordPress installation. Now you are just one step away i.e. transferring domain across.
To your new single site migration your domain from a multisite network
In a multisite network, how you have set up the multisite network will provide you the answer to whether you need to migrate the domain name or not.
For a single new website, you will have to register and use them, if you were making use of subdirectories or subdomains and not mapping domains.
But if you are looking for the domain name same as your old site then ensure that it is not indicating on the network to your old site.
From multisite if you have removed the sub-site then by that ate the domain name will no longer in use. But still, you will have to make sure it is indicating on your new website.
You will have to get the domain name to do this which will indicate to your new website with the help of DNS.
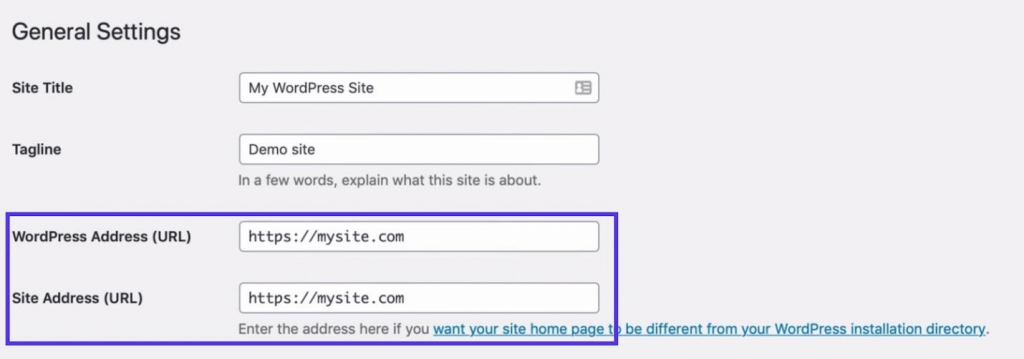
In your new site update the settings by going to the settings tab and clicking on the general tab.
In the site address and Site URL field, add the correct domain name and save all the changes.
Now you are done with all the steps. As a single WordPress website, your website will start working now.
How to go back to a single site from the entire multisite network
In some scenarios, from WordPress multisite network you don’t need to move a single site but other than this you will need to go back to complete the network to a single website and might do not want to run a multi-website at all.
This is a complicated step, but if your network consists of a very less number of websites then this might be relevant or in case if you want to remove all sites by just ignoring the base site.
This can be done only with the base site, which was there already before multisite activated.
To implement this you need to follow 5 basic steps
Move or delete all sites available in the network
- Delete and uninstall all plugins and theme that is not in use by your base site
- Users which are not having access to the base site, delete it.
- On your WordPress installation deactivate WordPress multisite
- The database tables added by multisite drop it.
- These are the basic 5 steps that you need to perform
Conclusion:
Migrating the WordPress multisite to a single site is a difficult job as compare to moving a single site. But actually moving multisite is not an impossible task as it seems.
In fact it there are possibilities that you can move your multi-network to a single site. By doing this you will ensure that the base site will remain at the same place.
Some basic steps are given in this blog that will help you to migrate the website. Fortunately rather than having a multisite network website you will have a new single site.

