WordPress Maintenance is an important aspect of running a webpage. To ensure that your website is running smoothly, regular updates need to be done. Such an update may include changes to the WordPress version, theme updates, and plugin updates.
Table of Contents
Before such an update, it is prudent to create a backup of WordPress. It can be risky to make quick changes to a live website.
Your website could crash during an update, as a result of which, there might be problems at the front end. Even minor changes to a widget can cause issues.
This is the reason why experienced WordPress users use a WordPress Staging environment so that nothing breaks on the live website.
Benefits
The staging environment is like a test site. Here, you can make plugin updates, code changes, new themes, and other required changes before going live.
It helps you detect errors so that your live website stays secure. Some WordPress users use the localhost to make changes, and once they are done they upload the changes to the live server.
But the issue with this method is that the live servers and localhost servers are not always running the same environment.
There is a possibility that something that worked on your localhost does not work on the live server. The WordPress Staging site is located on the web hosting server, and as such, can prevent these errors from occurring.
Creating a staging site for WordPress is highly advantageous. With it, you can ensure that your live website never goes into offline mode.
Updates are frequent and important, so it is a good idea to make sure there are no errors at your front end. Once you are satisfied with the changes you made, the test website can be copied over to your live website.
How to Create a Staging or Development Environment
Before testing changes, you want to stop search engines from crawling your website. Search engines look for duplicate content and you don’t want them crawling your website while you’re testing changes because duplicate items are not tolerated in the search engine world. It may lead to penalties.
Prevent Search Engine Crawling
Staging sites will have indexing turned off by default so that they don’t affect the SEO on your live production site. Go to Settings in the WordPress dashboard of your staging site.
Under “Reading”, check the box which says “Discourage search engines from indexing this site”. This setting adds the following HTTP header onto your WordPress site:” x-robots-tag:noindex, nofollow, nosnippet, noarchive”.
Creating a Staging Site using Bluehost
Many WordPress hosts have built-in staging sites included with their service. Managed WordPress hosting services specialize in hosting WordPress websites and offer a simplified hosting environment, expert WordPress support, daily backups, and performance features such as caching.
This is a user-friendly way of building a staging site. Hosts such as Bluehost, SiteGround, Kinsta, and Flywheel offer staging sites along with their plans. Here, we will see how to create a WordPress Staging site using Bluehost:
- Login to WordPress site’s admin area.
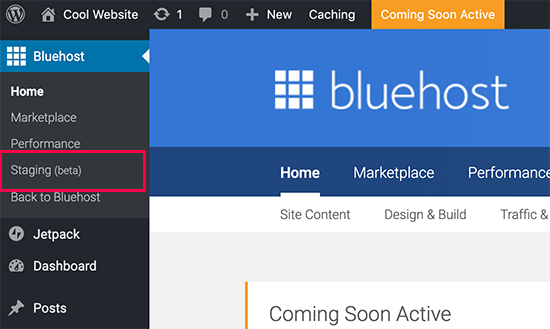
- Go to Bluehost->Staging
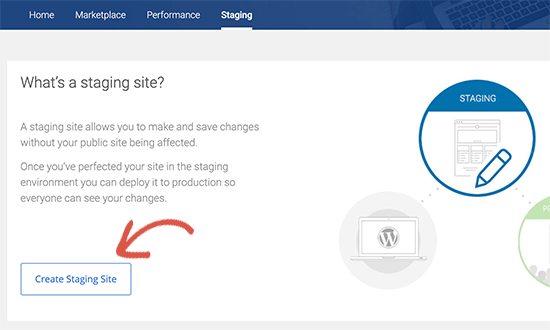
- Click on Create Staging Site
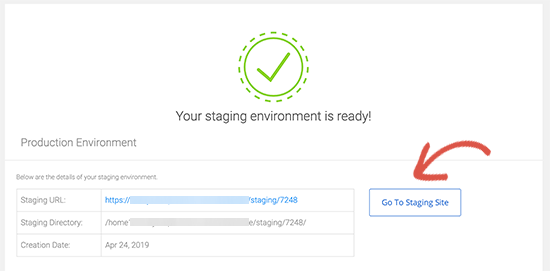
- Click on Go To Staging Site
Creating a Staging Site using a plugin
WP staging
You can use the plugin WP staging to create a staging site for WordPress. You can use it to test basic themes or small changes that you made to see if things are working as expected. More complicated plugins could potentially interfere with the rest of WordPress, causing unexpected issues.
Using WP staging you can first create a test site where you can install other, more complex plugins and see if they are working fine. In this way, you can avoid any downtime after a failed update or installation.
WP Stagecoach
You can create a WordPress Staging site using WP Stagecoach.
WP Stagecoach stores the staging site on their server and not yours. This may be preferable to WP Staging since the latter reduces the amount of space in your hosting plan by installing the staging area on your main domain.
First, you need to install and activate the plugin. Next, enter your username and API key. To set up a new staging area in WPStagecoach.com, just enter the name of your staging site.
There is also the option of disabling caching in the staging area for WordPress Staging. The site can also be password-protected. WP Stagecoach does not copy of the previous staging areas. You can log in to your staging site using the same username and password you use to log in to your live website.
On the WP Stagecoach page in your staging area, there is a link to phpMyAdmin. Using this, you can make changes to the WordPress database. WP Stagecoach is a premium plugin but extremely impressive. It has useful features such as password protection, and large files being copied over.
Creating a Staging Site manually
If you are aiming for a more complex environment where you get a chance to experiment with custom code changes and such, then you should create a staging site manually.
It is vital that you use a subdomain and not localhost, to ensure that your hardware environment is similar. Use the following steps to manually set up a WordPress Staging area:
- Create a subdomain: First, create a subdomain using cPanel. Name your subdomain.
- Create a new FTP account: Click on FTP Accounts and enter the required details. The directory should be the same as your subdomain.
- Upload the files: Upload your files using your new FTP account. First, download the latest version of WordPress and upload it. Upload the following folders to the staging site:
- Export/Import Your Database: Migrate the database from your live site. Create a new database in the staging site. Create a new database user and give them access to your database. Find the new database in PHPMyAdmin and click on Import.
- Edit wp-config.php: This is the last step for creating a WordPress Staging site. Edit the wp-config.php file. It should use your new database details and username. The database prefix should match that in your live site.
- You can now login using the username and password that you use on your WordPress site to log in.
…/wp-content/uploads
…/wp-content/themes
…/wp-content/plugins


