Are you looking forward to including some WordPress push notifications to your website?
Then you should know about it before jumping right to the action. Push notifications help in sending notifications to the various users, even though they are not accessing your website.
Table of Contents
The push notifications are clickable messages, which appear on the top of the mobile or desktop in the notification area. It can also appear even when the browser isn’t open. Apart from just the desktop, push notifications even work on mobile devices, which helps in reaching out to the various users across devices.
Its provide the news of upcoming updates or any kind of offers. The web push notifications are very helpful as well as effective for converting any website visitors to customers as well as loyal visitors.
You need to push notifications to make your visitors stick to your website so that the traffic increases. Although email lists are still an effective marketing tool, push notifications are effective too.
There are a lot of reasons behind the popularity of push notifications since it is small, and requires lower attention compared to the email or the social media, doesn’t involve algorithm, etc. Listed below are some of the ways by which you can add push notifications to the WordPress sites.
Use of One Signal for Push Notifications in WordPress sites
One Signal is mainly a free WordPress push notifications services, which can be used for WordPress websites. It helps in the easy addition of push notifications for most of the websites. At first, you have to install One Signal and activate its plugins.
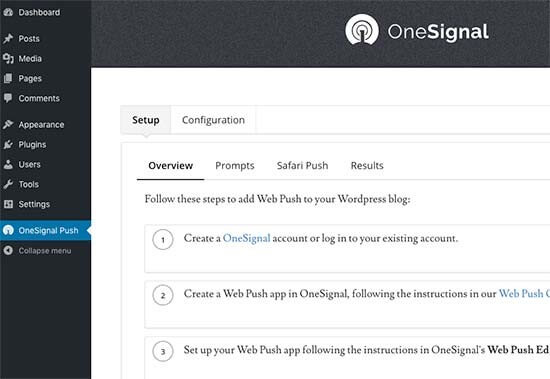
After activating it, the plugin will include a new menu item named One Signal to the WordPress admin bar. Tapping on it will redirect you to the plugin’s Settings page. The setting page is separated into Configuration Tabs and Setup.
Setup tab is detailed documentation on the different ways of setting up the actual One Signal push notifications in WordPress. You will require to add API Key and APP ID inside the plugin settings.
Step 1: Setting the One Signal Push Notifications
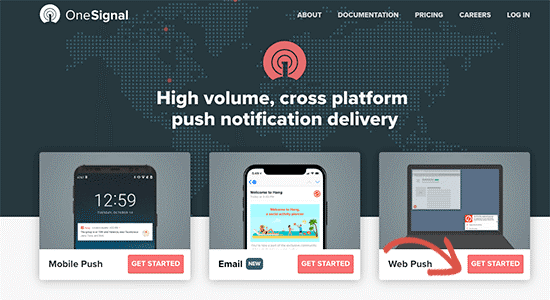
At the very beginning, you have to visit One Signal website, and tap on the get started button located next to the Web Push option. Then you will be asked for providing a password as well as email so that you can create an account.
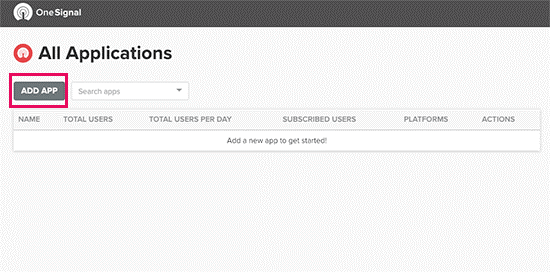
After that, you will be taken to the One Signal dashboard, where you have to select the ‘Add App’ button for creating the first application. You will have to provide a particular name for the application for your WordPress push notifications so that you can identify it.
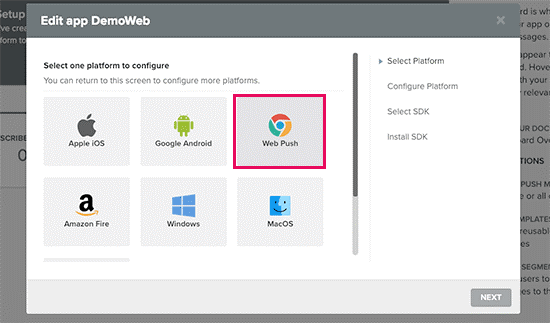
Then, you will have to select a platform, and for this, you can select different platforms for the application Choose ‘Web Push’ and tap on the Next button for continuing.
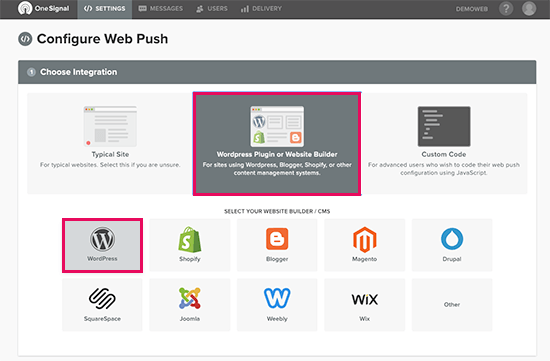
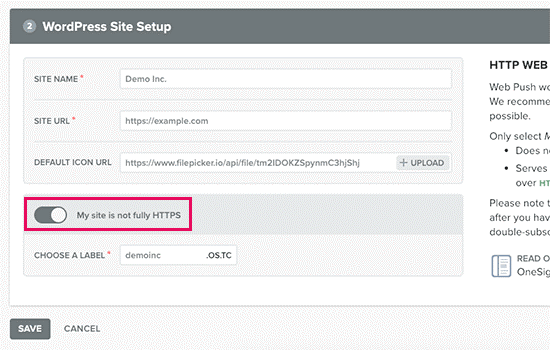
In the next step, you will have to choose the integration method. Click on the ‘WordPress Plugin’ box and choose WordPress. You have to put a website name, URL, and logo. This logo will appear in the notifications and it is best if you use a site icon.
Below you will notice a toggle, that you can activate if the WordPress site isn’t using HTTPS. Push notifications can only be sent from a secure HTTPS URL. As soon as you complete, tap on the save button to store the One Signal setting, and then you can go back to the One Signal plugin setting on the WordPress site and go to the ‘Configuration’ tab.
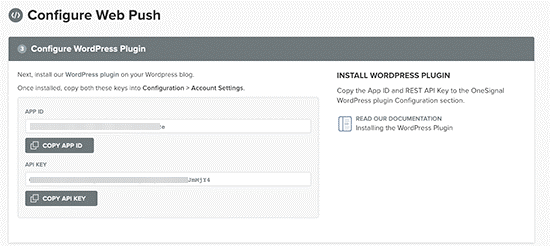
Here you will have to paste both the APP and API keys, which you earlier copied. The API keys only let you send push notifications through Chrome as well as Firefox web browsers. You might also require Safari Web ID for sending Push notifications via the Safari Web browser.
If you want to receive the Safari API key, you have to go back to One Signal website and visit the settings page for the application. After that, you have to click on the edit icon, which is located next to the Safari.
Step 2: Customize the Popup Prompt of the Push Notification
Basics of a push notification popup are very simple since it uses generic language as well as displays the site’s logo. You can surely customize it for making it look more personal.
Just switch to the configuration tab, which is present under One Signal plugin’s settings age for the WordPress site come to the ‘HTTP Pop-Up Settings’ section. You have to tap on the toggle present next to ‘Customize the HTTP Pop-up Prompt text’, and after that, you can start to include your text for WordPress push notifications.
Also, you must not forget to select the Save button for storing the settings before testing the prompt.
Step 3: Customize the Bell Notification Icon
Usually, browser prompt for notification and the popup vanishes mostly when the users dismiss them. In case the users change their mind for getting notifications and want to activate the WordPress push notifications then, the subscription bell present in the One Signal helps in showing the users a prompt on the site.
Also, the bell icon is fully customizable, which is present in the plugin settings page. Just come down to the ‘Prompt Settings and the subscription Bell’ area, and activate the customization option that you look to change. After that change the settings for every single option that you want to customize accordingly.
Mostly, the colors of the bell icon are necessary to change for matching the theme colors.
Step 4: Send Push Notifications from WordPress Site
One Signal plugin by default automatically sends push notifications when any new post is published on your website. You can deactivate this feature from the setting page of the plugins under the ‘Automatic Notification Settings’ section.
If you want, you can also manually send a notification when you publish or make any new post. Just edit a WordPress post or page, then you will automatically notice One Signal meta box under the document settings column present on the right.
Therefore, these are some of the significant steps that are necessary to follow if you want to add push notifications for the WordPress site.


