Are you getting this message again and again “The Link You Followed Has Expired?” Are you unable to process your theme and plugins from WordPress? Do you want an immediate solution to this? So, read on this page and we will show you how you can solve this issue quickly.
Table of Contents
Before jumping to the solution, first, it is vital to understand why this happens. This occurs when the user is trying to put a large image than the default. In other words, WordPress has set its limits about images, so if you are trying to upload a large image than “The Link You Followed Has Expired’ message displays.
So, how you can fix this? Simple by increasing the limit of upload default WordPress.
In this guide, we will show you a step-by-step guide to fix this issue. Let us get started!
Reasons for ‘The Link You Followed Has Expired’ Error
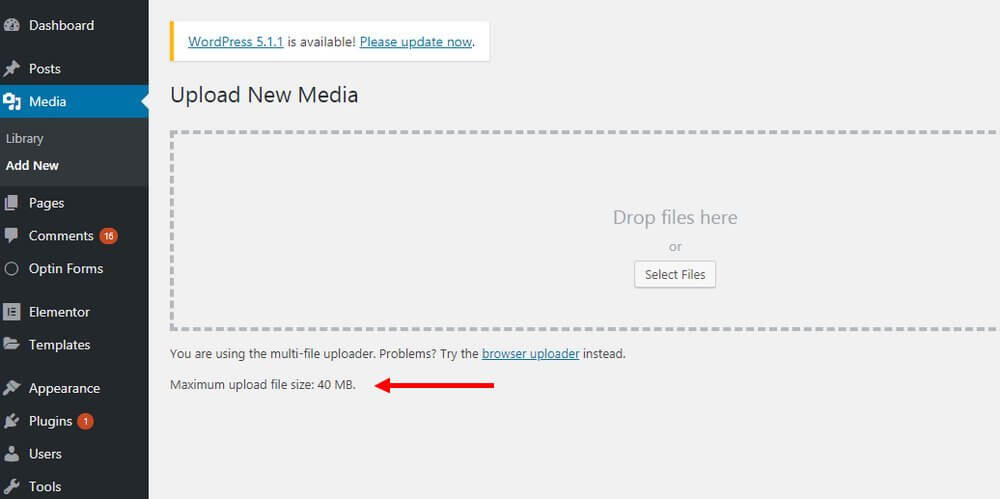
If you are to go and open the WordPress dashboard then Media to add new options there you will see the WordPress has set its limits for uploading and executing the image. When you are trying to upload a larger image it will you the notice and you are unable to do fix the issue.
Moreover, the size mostly depends on the web hosting server you are using. Suppose the webserver provides 100mb as the maximum limit to upload images and smaller to 25mb. This limit usually keeps you limited with upload and you are unable to put heavy themes.
Or if your website web server providing you larger image size to upload then this may not trouble you. Perhaps you understand what you have to do now.
Yes, you are getting my point, you have to boost size limit along with execution.
How?
So, here we have suggested some methods that can help to fix this issue and you can enjoy the better UX.
Well, it is not an easy task, you have to edit the WordPress file and copy some HTML script. Don’t worry, we will guide you on every walk. We have listed a few methods, so don’t panic if you failed firstly.
Special note- Apply the given method carefully and follow it correctly. Also, don’t forget to create a backup.
First Method- Edit .htaccess File
.htaccess is an important file of WordPress. You need to use this file to increase the default size of upload image and execution. So, to edit .htaccess all you need to access the Wordpress files in the server. You have another option too instead .htaccess is the FTP file.
How to proceed:
- First login to C Panel from your hosting account.
- Enter your C Panel details such as username and password.
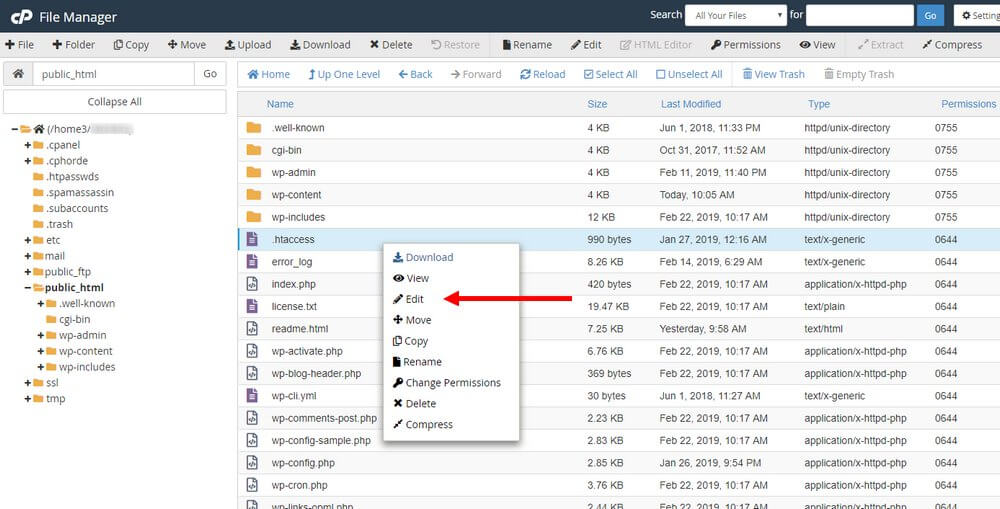
- Select the file manager file and open it. It will speedy you which and where you need to navigate.
- Select the public.html folder and here you will see .htaccess file. Then right-click on the file and choose the edit option.
- Then copy-paste the following lines and click on the Save button.
“Php_value upload_max_filesize 64M
Php_value post_max_size 64M
Php_value_max_execution_time300
Php_value max_input_time300”
Second Method- Create PHP.ini File
If you are failed in the first attempt then don’t worry choose this trick. Here you have created a PHP.ini.file into the webserver to resolve The Link You Followed Has Expired error. Well, sometimes hosting server have already crated this file, in case you haven’t then follow the given steps:
Keep in mind the PHP.ini file created on your computer and then upload it on the server. To do this:
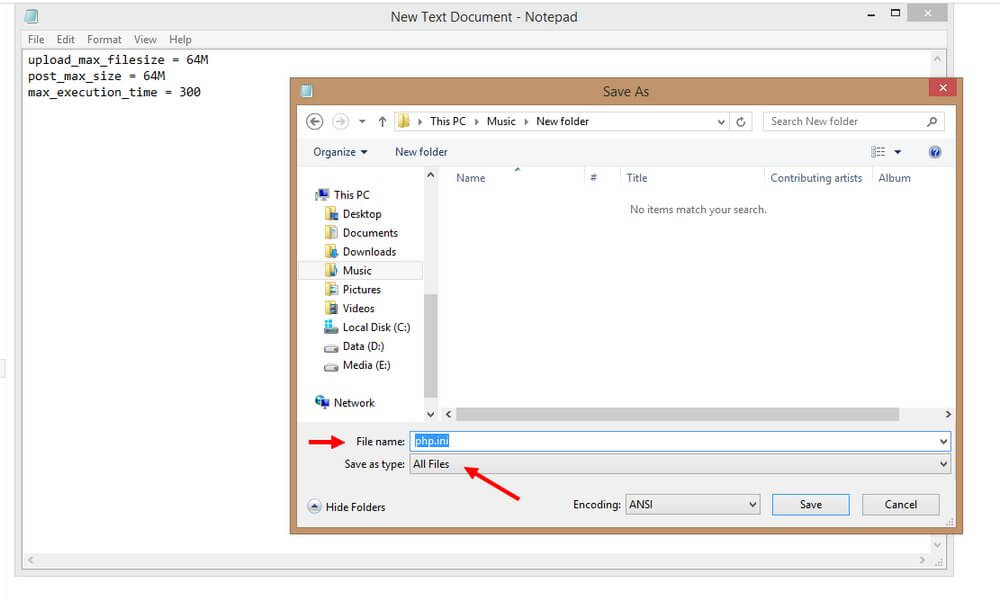
- Open notepad and enter the following details and save the file with php.ini name.“Upload_max_filesize=64M
Post_max_size=64M
Max_execution_time=300” - Now, upload the file into the webserver. To do this:
Find the public.html folder and upload the php.ini file into it. Once it uploads, it will fix all the issues and you have increased the limit and i.e 64MB.
Wrapping Up
These are the two methods that can help to fix “The Link You Followed Has Expired” issue. Once it resolves, you can easily manage your theme and plugins. If you are still in a problem, then contact your web hosting service team and get the solution for it. We hope this guide helps you.


