A logo is the first and most memorable thing you usually see on a website. Because of its branding capabilities, logos are usually placed on the top left corner of a webpage. Typically, you would start creating your website by adding a logo and then build your website around it.
Table of Contents
But how do you add a logo to the WordPress website? Even though it’s relatively simple, there are multiple ways you can add a custom logo to your site. We’ve gathered four working methods, so make sure to tune in.
So, how do you add a logo to your website?
When it comes to adding a logo to your website, it all really depends on your WordPress theme. Before moving to upload your logo, the very first thing you should do is activate your theme.
Most themes allow you to add your logo through the Appearance tab on the left side of your WordPress dashboard (see the first listed method.)
However, this method is not universal since many theme developers offer different ways to upload logos. We’ll show you multiple step-by-step instructions to upload your logo.
The only way to choose the right method is by trial and error. So, make sure to try out different methods to see which one works with your theme.
Adding a logo through the Customize page of the Appearance section
We placed this method as a number one because it works with most of the themes. Follow these instructions to add a logo to your site.
-
- Open your WordPress dashboard.
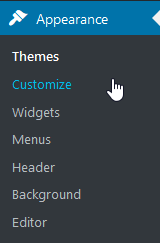
- Locate the Appearance tab on the left of the dashboard.
- In the Appearance tab, click Customize to open the Customize page.
-
- Locate Site Identity on the left sidebar.
- On the Site Identity panel, find and click Select logo.
- The Media Library tab should appear. Select the Upload Files tab in the upper left corner of the dialog box.
- To upload your file, you can either drag-and-drop it or navigate your file’s location through the Select Files option. If you want to drag-and-drop your file, select it from your computer’s file manager and drag it to the dedicated area. If you prefer uploading your files through Select Files, click the button, navigate the location of the file on your computer and double-click to upload.
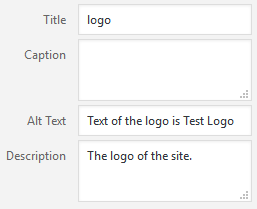
- Once your file finished uploading, you will see the Media Library window with the uploaded file. Fill out the Title, Caption, Alt Text, and Description text boxes.
- Now, you should see the Crop Image dialog box. Use the resizing handles to resize your logo and click Crop.
- Because most logos typically include the brand’s name, you may want to remove Site Title and Tagline. To remove them, uncheck the following box:
- Now, as you’ve uploaded your logo and removed the site title and tagline, click Save & Publish at the top of the Site Identity panel.
Adding a logo through the Header section of the Appearance tab
This method will work for you if your theme allows uploading images through the Header section of the Appearance tab.
-
- Open your WordPress dashboard.
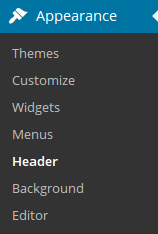
- Locate the Appearance tab on the left of the dashboard.
- In the Appearance tab, click the Header option in the dropdown menu.
- Find the option that allows you to upload images. This step will vary depending on your theme.
- To upload your file, you can either drag-and-drop it or navigate your file’s location through the Choose Files option. If you want to drag-and-drop your file, select it from your computer’s file manager and drag it to the dedicated area. If you prefer uploading your files through Select Files, click the button, navigate the location of the file on your computer and double-click to upload.
- Before saving changes, make sure to uncheck the Show header text with your image box.
- Save the changes and go to the front-end to preview your logo.
Adding a logo through the Theme Options tab
- If the previous method didn’t work with your theme either, no worries, we’ve got you covered.
- Open your WordPress dashboard.
- Locate the Theme Options tab on the left of the dashboard.
- Locate the area where you can upload the image of your logo. This step will vary based on your theme.
- To upload your file, you can either drag-and-drop it or navigate your file’s location through the Select Files option. If you want to drag-and-drop your file, select it from your computer’s file manager and drag it to the dedicated area. If you prefer uploading your files through Select Files, click the button, navigate the location of the file on your computer and double-click to upload.
- Don’t forget to save changes.
If this method didn’t work too, we recommend searching around the tabs on the left of your dashboard to locate logo, header, or theme customization options.
Adding a logo by modifying code
This method requires some coding skills. However, modifying your code is the best way to get your logo in WordPress into the right position. Follow this guide to add your logo manually.
Important note: We don’t recommend modifying this in your dashboard. Rather, make changes in your locally saved file.
- Go to the Media tab and upload the image of your logo to the server.
- Locate the Header.php file.
- Press Ctrl/Command + F and type in “h1” to locate the line that starts with the h1 brackets.
- Erase any code that goes after the tag and before the tag.
- Paste the code below so that it looks like this:
<h1><img src=”URL of your uploaded logo” border=0 alt=”Name of your site” /></h1>
Why are logos so important?
When building a business, creating a logo might not seem like a top priority for many of us. Some business owners consider running their business with no logo at all.
And they couldn’t be more wrong. Having a logo is a fundamental part of establishing and maintaining your brand identity.
Besides that, logos are great attention grabbers that can help you make a great first impression. We hope that this article was helpful, and good luck with launching your website!


